Fail2ban sits between your firewall and your auth log. When it sees the same IP failing to authenticate more than a set number of times within a window, it adds a firewall rule to block that IP temporarily.
It’s an automated response layer. You set the thresholds, it handles the rest. Your auth log goes from a constant stream of failed attempts to occasional ones — and those occasional ones get blocked automatically.
How Fail2ban Works
Fail2ban monitors log files for patterns that match configured rules (called jails). For SSH, it watches /var/log/secure on Rocky Linux for lines like:
Failed password for root from 185.220.101.45 port 54321 ssh2When the same IP produces more than maxretry matching lines within findtime seconds, Fail2ban adds a firewalld rule to block that IP for bantime seconds.
Three settings control the behavior:
maxretry— number of failures before a ban (default: 5)findtime— time window in seconds to count failures (default: 600 = 10 minutes)bantime— how long the ban lasts in seconds (default: 600 = 10 minutes)
The default bantime of 10 minutes is short — bots just wait it out. Increase it.
Step 1 — Install Fail2ban
sudo dnf install fail2ban -yStep 2 — Create jail.local
Fail2ban ships with a default config file at /etc/fail2ban/jail.conf. Never edit this file directly — it gets overwritten on updates. Instead, create a jail.local override file:
sudo nano /etc/fail2ban/jail.localAdd this content — substitute your actual SSH port:
[DEFAULT]
# Ban duration: 1 hour
bantime  = 3600
# Time window to count failures: 10 minutes
findtime = 600
# Failures before ban
maxretry = 5
# Use firewalld as the backend
banaction = firewallcmd-ipset

[sshd]
enabled  = true
port     = 2222
logpath  = /var/log/secure
maxretry = 5Save and exit: Ctrl+O, Enter, Ctrl+X.
Step 3 — Enable and Start Fail2ban
sudo systemctl enable --now fail2banVerify it started correctly:
sudo systemctl status fail2banYou should see active (running).
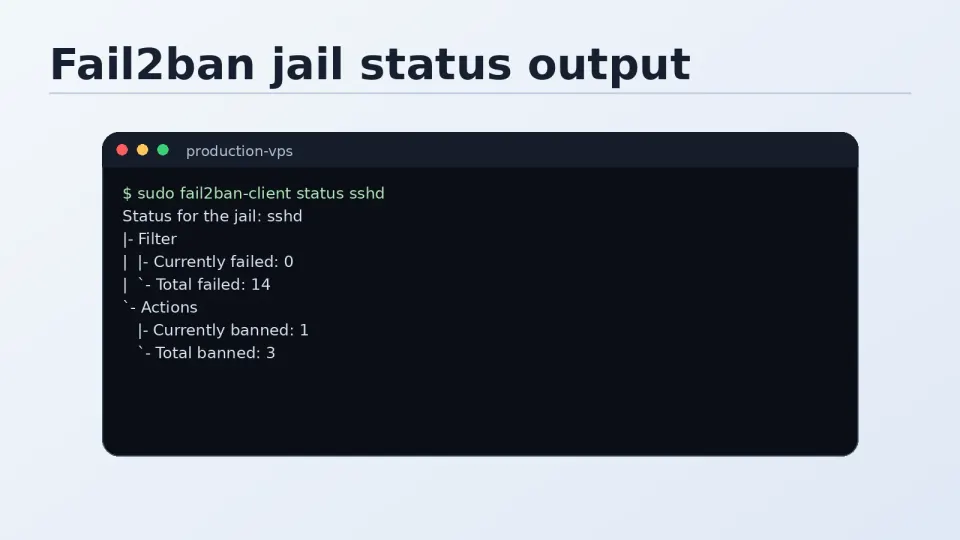
Step 4 — Verify the SSH Jail is Active
sudo fail2ban-client status sshdOutput:
Status for the jail: sshd
|- Filter
|  |- Currently failed: 2
|  |- Total failed:     47
|  `- File list:        /var/log/secure
`- Actions
   |- Currently banned: 0
   |- Total banned:     12
   `- Banned IP list:
Currently failed shows IPs being watched. Total banned shows IPs banned since Fail2ban started. If the jail is active and watching the right log file, setup is complete.
Checking the Ban Log
Fail2ban logs its actions to /var/log/fail2ban.log:
sudo tail -20 /var/log/fail2ban.logYou’ll see entries like:
2026-06-08 09:15:03,412 fail2ban.actions [1234]: NOTICE  [sshd] Ban 185.220.101.45
2026-06-08 10:15:03,412 fail2ban.actions [1234]: NOTICE  [sshd] Unban 185.220.101.45
The ban and unban timestamps match the bantime setting. Check this occasionally to confirm Fail2ban is actively working — if the log is empty or shows no bans for a server that has been online for days, something may be misconfigured.
When You Ban Yourself
It happens. You mistype your SSH key passphrase a few times, or you’re connecting from a new location and hit some authentication issue, and suddenly you can’t connect at all.
The symptom: SSH connection fails immediately, no password prompt, no key prompt. Just refused. You check that SSH is running — it is. You check firewalld — nothing new. Then you remember Fail2ban.
Step 1 — Find your current IP (run this from your local machine):
curl ifconfig.meStep 2 — Unban it (run this on the server — use Vultr console if locked out):
sudo fail2ban-client set sshd unbanip 1.2.3.4Replace 1.2.3.4 with your actual IP.
Step 3 — Verify:
sudo fail2ban-client status sshd
# Banned IP list should no longer include your IP
Then try connecting again.
Recommended Settings Summary
The defaults are functional but not optimal. Here’s what I’d use for a personal VPS:
[DEFAULT]
bantime  = 3600    # 1 hour (vs default 10 minutes)
findtime = 600     # 10 minutes — keep default
maxretry = 5       # 5 attempts — keep default
banaction = firewallcmd-ipset

[sshd]
enabled  = true
port     = 2222    # Your actual SSH port
logpath  = /var/log/secure
maxretry = 5
For stricter settings on a production server:
bantime  = 86400   # 24 hours
maxretry = 3       # 3 attempts
The tradeoff: stricter settings mean you’re more likely to lock yourself out after a few mistyped passphrases. For a personal server where you have the Vultr console as a fallback, the stricter settings are worth it.
Ongoing Monitoring
Fail2ban runs quietly in the background once configured. A minimal monitoring routine:
# Check jail status and current bans
sudo fail2ban-client status sshd

# See recent ban activity
sudo tail -50 /var/log/fail2ban.log | grep -E "Ban|Unban"

# Count total unique IPs banned since install
grep "Ban " /var/log/fail2ban.log | awk '{print $NF}' | sort -u | wc -l
That last command gives you a sense of the actual attack volume your server receives. The number is usually higher than you’d expect.