Before Running Certbot
Two requirements:
1. Your domain must be pointing to this server. Certbot verifies ownership by making an HTTP request to your domain. If DNS hasn’t propagated yet, certbot fails. Point the domain first (Part 5.5), wait for propagation, then run certbot.
2. Port 80 must be open. Certbot’s HTTP challenge uses port 80. Verify it’s open:
sudo firewall-cmd --list-services
# Should include: http
If not:
sudo firewall-cmd --permanent --add-service=http
sudo firewall-cmd --reload
Step 1 — Install Certbot
sudo dnf install certbot python3-certbot-nginx -yThe python3-certbot-nginx package is the Nginx plugin — it lets certbot read and modify your Nginx config directly.
Step 2 — Run Certbot
sudo certbot --nginx -d yourdomain.com -d www.yourdomain.comWhat happens when you run this:
- Certbot contacts Let’s Encrypt servers
- Places a temporary verification file on your server
- Let’s Encrypt makes an HTTP request to verify you control the domain
- Certificate is issued and saved to
/etc/letsencrypt/live/yourdomain.com/ - Certbot reads your Nginx config and adds the SSL configuration
- Certbot asks whether to redirect HTTP to HTTPS — choose 2 (Redirect)
The output ends with something like:
Congratulations! You have successfully enabled HTTPS on https://yourdomain.com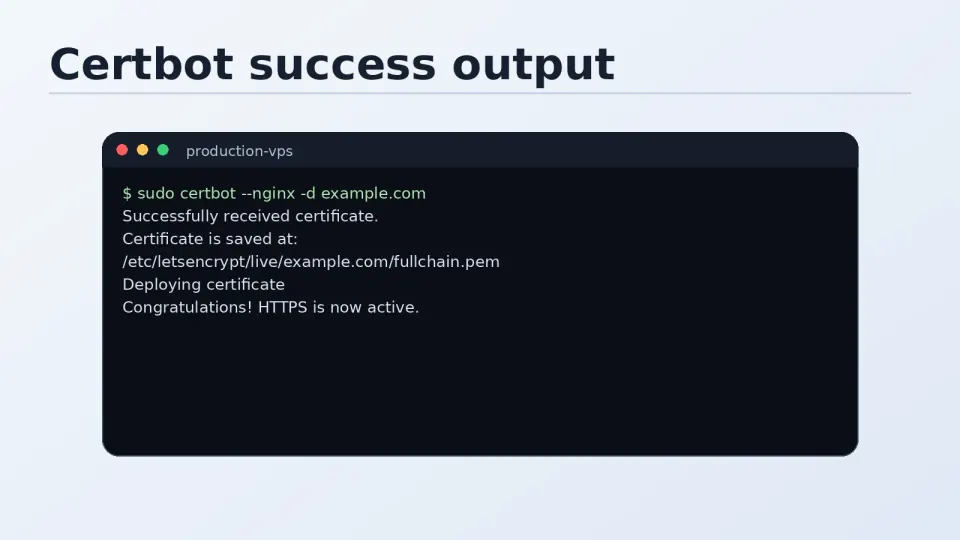
What Certbot Actually Does to Nginx
This is the part that confused me initially. After certbot runs successfully, open your Nginx server block:
sudo cat /etc/nginx/conf.d/yourdomain.confCertbot has added several lines — SSL certificate paths, HTTPS listener, and an HTTP redirect block. It looks something like this (simplified):
server {
    listen 443 ssl;
    server_name yourdomain.com www.yourdomain.com;

    ssl_certificate /etc/letsencrypt/live/yourdomain.com/fullchain.pem;
    ssl_certificate_key /etc/letsencrypt/live/yourdomain.com/privkey.pem;
    include /etc/letsencrypt/options-ssl-nginx.conf;
    ssl_dhparam /etc/letsencrypt/ssl-dhparams.pem;

    # ... your original server block content ...
}

server {
    listen 80;
    server_name yourdomain.com www.yourdomain.com;
    return 301 https://$host$request_uri;
}
The second server block is the redirect — any HTTP request gets permanently redirected to HTTPS. This is why refreshing the browser after certbot should show HTTPS.
When Nothing Changes After Running Certbot
This happens when certbot generates the certificate but fails to update the Nginx config correctly — usually because the server block structure is non-standard.
Check if certbot added the SSL config:
grep "ssl_certificate" /etc/nginx/conf.d/yourdomain.confIf nothing is returned, certbot didn’t update the config. Add the SSL and redirect blocks manually:
# Add to your existing server block
listen 443 ssl;
ssl_certificate /etc/letsencrypt/live/yourdomain.com/fullchain.pem;
ssl_certificate_key /etc/letsencrypt/live/yourdomain.com/privkey.pem;
include /etc/letsencrypt/options-ssl-nginx.conf;
ssl_dhparam /etc/letsencrypt/ssl-dhparams.pem;
Add a separate HTTP redirect block:
server {
    listen 80;
    server_name yourdomain.com www.yourdomain.com;
    return 301 https://$host$request_uri;
}
Then test and reload:
sudo nginx -t && sudo systemctl reload nginxAlso Open Port 443
sudo firewall-cmd --permanent --add-service=https
sudo firewall-cmd --reload
If port 443 isn’t open, HTTPS connections are blocked at the firewall level and the browser shows a connection timeout.
Step 3 — Verify HTTPS is Working
Visit your domain in a browser: https://yourdomain.com
You should see the padlock icon in the address bar. Click it to see certificate details — it should show “Let’s Encrypt” as the issuer.
Test with curl:
curl -I https://yourdomain.comResponse should show HTTP/2 200 or HTTP/1.1 200 OK — not a certificate error.
Step 4 — Set Up Auto-Renewal
Let’s Encrypt certificates expire after 90 days. Certbot installs a systemd timer for automatic renewal:
sudo systemctl status certbot-renew.timerIf it shows active, renewal is handled automatically. Certbot renews certificates when they’re within 30 days of expiry.
Test that renewal works:
sudo certbot renew --dry-run--dry-run simulates the renewal process without actually renewing. If it completes without errors, auto-renewal will work when the time comes.
If the timer isn’t active, set up a cron job instead:
sudo crontab -eAdd this line — runs certbot at 2am daily, only renews if needed:
0 2 * * * /usr/bin/certbot renew --quietSave and exit. The --quiet flag suppresses output unless there’s an error.
The 3-Month Expiry Problem
The first time a certificate expires with a red browser warning, it’s usually because the renewal command was never confirmed to work. The fix is one command:
sudo certbot renewAfter fixing it, run --dry-run to verify auto-renewal is properly configured so it doesn’t happen again.
The habit: after installing a new certificate, immediately run certbot renew --dry-run to confirm the renewal pipeline works. Takes 10 seconds and avoids the 3am emergency when a client site shows red.