Ten minutes here. If anything is broken, you find out now — when only one thing is being installed — instead of after WordPress is on top of it.
The Complete Verification Checklist
Run through these in order. Each test confirms one layer of the stack.
Test 1 — All Services Running
sudo systemctl status nginx php-fpm mariadbAll three should show active (running). If any shows failed or inactive:
# Check which one failed and why
sudo journalctl -u nginx --no-pager | tail -20
sudo journalctl -u php-fpm --no-pager | tail -20
sudo journalctl -u mariadb --no-pager | tail -20
Don’t continue until all three services are running.
Test 2 — Nginx Serving Your Domain
Create a simple HTML test file in your web root:
echo "<h1>Nginx is working</h1>" | sudo tee /var/www/yourdomain.com/test.htmlVisit in browser: http://your-server-ip/test.html
You should see “Nginx is working”. If you get a 403 or 404:
# Check web root exists and has correct permissions
ls -la /var/www/yourdomain.com/
sudo chown -R nginx:nginx /var/www/yourdomain.com/
Clean up after:
sudo rm /var/www/yourdomain.com/test.htmlTest 3 — PHP Processed by Nginx
Create a PHP info file:
echo "<?php phpinfo(); ?>" | sudo tee /var/www/yourdomain.com/phpinfo.phpVisit: http://your-server-ip/phpinfo.php
Expected: A page full of PHP configuration information showing PHP 8.3.x.
If you see the raw PHP code instead of the info page: Nginx is not passing .php files to PHP-FPM. Check:
# Verify PHP-FPM socket exists
ls -la /run/php-fpm/www.sock

# Verify the socket path in your server block matches
grep "fastcgi_pass" /etc/nginx/conf.d/yourdomain.conf
# Should show: fastcgi_pass unix:/run/php-fpm/www.sock;
If you get a 502 Bad Gateway: PHP-FPM is not running or the socket path is wrong.
sudo systemctl status php-fpm
sudo nginx -t
Delete phpinfo.php immediately after testing:
sudo rm /var/www/yourdomain.com/phpinfo.php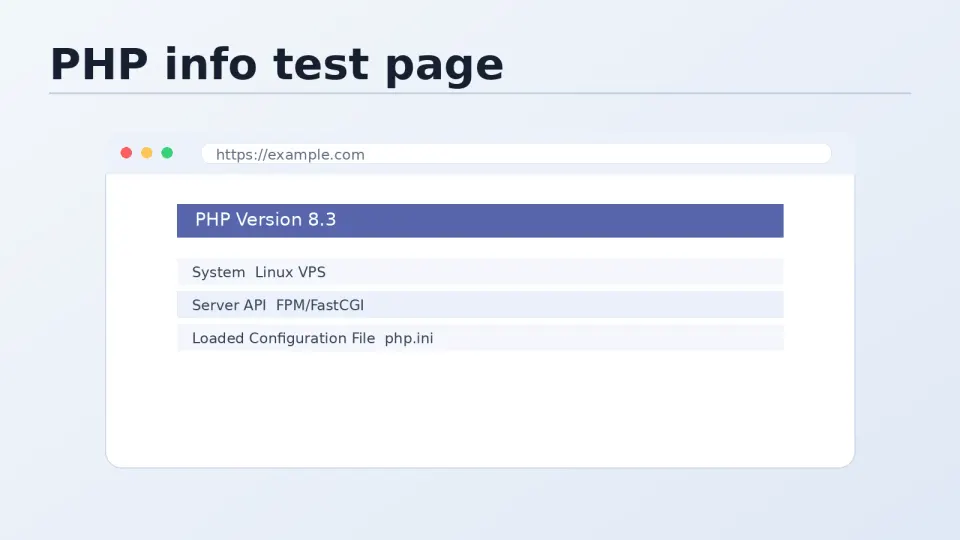
Test 4 — PHP Can Connect to MariaDB
Create a quick connection test file:
sudo nano /var/www/yourdomain.com/dbtest.phpAdd this content — replace with your actual database credentials:
<?php
$host = 'localhost';
$db   = 'wordpress_site';
$user = 'wp_user';
$pass = 'your-database-password';

$conn = new mysqli($host, $user, $pass, $db);

if ($conn->connect_error) {
    die('Connection failed: ' . $conn->connect_error);
}
echo 'Database connection: OK<br>';
echo 'PHP version: ' . phpversion() . '<br>';
echo 'MySQL client version: ' . $conn->get_client_info();
$conn->close();
?>
Visit: http://your-server-ip/dbtest.php
Expected output:
Database connection: OK
PHP version: 8.3.x
MySQL client version: mysqlnd x.x.x
If connection fails: Check the database name, username, and password match what you created in article 4.3. Common mistake: wrong database name or a typo in the password.
Delete after testing:
sudo rm /var/www/yourdomain.com/dbtest.phpTest 5 — FastCGI Cache Directory
Verify the cache directory exists with correct permissions:
ls -la /var/cache/nginx/Expected:
drwxr-xr-x nginx nginx fastcgiIf the directory doesn’t exist or ownership is wrong:
sudo mkdir -p /var/cache/nginx/fastcgi
sudo chown -R nginx:nginx /var/cache/nginx/
Test 6 — FastCGI Cache Headers
After visiting any page on your domain (once WordPress is installed, but you can test now with any PHP file), check the cache header:
curl -I http://your-server-ip/Look for the X-Cache-Status header in the response. On first request it will show MISS (page not yet cached). On second request to the same URL it should show HIT.
X-Cache-Status: MISS   ← first request, page is being cached
X-Cache-Status: HIT    ← subsequent requests, served from cache
X-Cache-Status: BYPASS ← cache deliberately skipped (admin, logged in)
If X-Cache-Status header doesn’t appear at all, the FastCGI cache directives in your server block aren’t being applied. Check that the add_header X-Cache-Status line is inside the location ~ \.php$ block.
Test 7 — Nginx Config Final Check
sudo nginx -T 2>/dev/null | grep -E "server_name|root|fastcgi_pass|fastcgi_cache"This shows all active config values across all included files. Verify:
server_namematches your domainrootpoints to your web root directoryfastcgi_passshows the Unix socket pathfastcgi_cacheshowsWORDPRESS
Full Stack Status Summary
Run this to see everything at once:
echo "=== Services ===" && \
sudo systemctl is-active nginx php-fpm mariadb && \
echo "=== Nginx config ===" && \
sudo nginx -t && \
echo "=== PHP-FPM socket ===" && \
ls /run/php-fpm/www.sock && \
echo "=== Cache directory ===" && \
ls -la /var/cache/nginx/ && \
echo "=== All checks complete ==="
If everything passes — all services active, nginx -t shows “test is successful”, socket exists, cache directory exists — the LEMP stack is ready for WordPress.
Part 5 starts the WordPress installation.