FastCGI cache is powerful, but it is only one layer of WordPress speed work. I explain the full stack in my WordPress performance stack guide.
This is the most important config file in the entire stack. Everything before this — Nginx installation, MariaDB, PHP-FPM — was preparation. This server block is what tells Nginx how to actually serve your WordPress site.
The config below is what I run on my own server. Every directive is explained so you know what you’re putting on your machine, not just that it works.
Server-Level Cache vs Plugin Cache — Before You Start
If you’re coming from shared hosting, you probably know WordPress caching through plugins: W3 Total Cache, WP Super Cache, WP Rocket. These work by generating static HTML files inside WordPress’s directory and serving them instead of re-running PHP each time.
FastCGI cache is fundamentally different — and understanding the difference matters before you configure it.
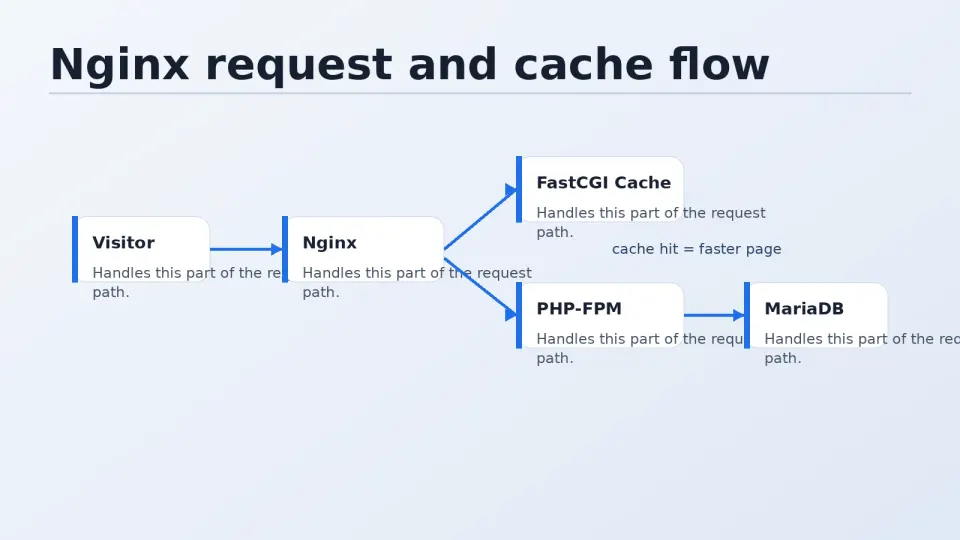
Without cache:
Browser → Nginx → PHP-FPM → WordPress → MariaDB → HTML → Browser
                  (PHP runs every time)

With plugin cache (WP Rocket etc.):
Browser → Nginx → PHP-FPM → WordPress checks cache → serves HTML file
                  (PHP still runs, but less work)

With FastCGI cache (HIT):
Browser → Nginx → serves cached HTML directly
                  (PHP never runs)
FastCGI cache operates at the Nginx layer — before PHP is even involved. A cache hit means zero PHP execution, zero database queries. The performance difference on real traffic is significant.
The WP Rocket disk space problem on VPS:
WP Rocket’s page cache creates a static HTML copy of every page on your site — stored in /wp-content/cache/. On a site with hundreds of posts, this can grow to several gigabytes. On shared hosting where disk space is managed for you, this goes unnoticed. On a VPS where you’re watching df -h yourself, it shows up fast.
If you’re running WP Rocket on a VPS and wondering why disk usage keeps climbing, check:
du -sh /var/www/yoursite/wp-content/cache/With FastCGI cache enabled at the Nginx level, WP Rocket’s page cache is redundant. This config disables it. WP Rocket’s other features (minification, lazy loading, database cleanup) still run — just not page caching.
A premium WordPress caching and frontend optimization plugin that applies many performance best practices quickly. It is useful when the site is already worth optimizing, but it cannot fix bad hosting, huge pages, or reckless plugin choices by itself.
Get WP Rocket →Affiliate link — I may earn a commission at no cost to you.
Step 1 — Create the Cache Directory
FastCGI cache needs a directory to store cached pages:
sudo mkdir -p /var/cache/nginx/fastcgi
sudo chown nginx:nginx /var/cache/nginx/fastcgi
Step 2 — Add FastCGI Cache Config to nginx.conf
Open the main Nginx config:
sudo nano /etc/nginx/nginx.confInside the http {} block, add these lines before the include /etc/nginx/conf.d/*.conf; line:
# FastCGI cache zone definition
fastcgi_cache_path /var/cache/nginx/fastcgi
    levels=1:2
    keys_zone=WORDPRESS:100m
    inactive=60m
    max_size=1g;

fastcgi_cache_key "$scheme$request_method$host$request_uri";
What this does:
fastcgi_cache_path— where cached files are stored on disklevels=1:2— directory structure for cache files (prevents thousands of files in one folder)keys_zone=WORDPRESS:100m— name the cache zone and allocate 100MB of RAM for the indexinactive=60m— remove cached items not accessed for 60 minutesmax_size=1g— maximum disk space for the cachefastcgi_cache_key— how Nginx identifies unique pages (scheme + method + domain + URL)
Save and exit.
Step 3 — Create the WordPress Server Block
Create a new config file for your domain:
sudo nano /etc/nginx/conf.d/yourdomain.confPaste the complete config below, replacing yourdomain.com with your actual domain and /var/www/yourdomain.com with your actual web root path:
# Cache bypass conditions
# These variables determine when NOT to serve cached content
map $http_cookie $no_cache_cookies {
    default         0;
    ~SESS            1;  # PHP sessions
    ~wordpress_logged_in 1;  # Logged in users
    ~comment_author  1;  # Comment authors
    ~woocommerce_    1;  # WooCommerce (cart, checkout)
}

server {
    listen 80;
    listen [::]:80;
    server_name yourdomain.com www.yourdomain.com;

    # Redirect HTTP to HTTPS (after SSL is installed in Part 5)
    # Uncomment after running Certbot:
    # return 301 https://$host$request_uri;

    root /var/www/yourdomain.com;
    index index.php index.html;

    # Access and error logs
    access_log /var/log/nginx/yourdomain.com.access.log;
    error_log  /var/log/nginx/yourdomain.com.error.log;

    # Security headers
    add_header X-Frame-Options "SAMEORIGIN" always;
    add_header X-Content-Type-Options "nosniff" always;
    add_header X-XSS-Protection "1; mode=block" always;

    # Hide Nginx version
    server_tokens off;

    # Gzip compression
    gzip on;
    gzip_types text/plain text/css application/json application/javascript text/xml application/xml application/xml+rss text/javascript;
    gzip_min_length 1000;

    # FastCGI cache settings for this server
    set $skip_cache 0;

    # Don't cache POST requests
    if ($request_method = POST) {
        set $skip_cache 1;
    }

    # Don't cache URLs with query strings
    if ($query_string != "") {
        set $skip_cache 1;
    }

    # Don't cache WordPress admin, login, or special pages
    if ($request_uri ~* "(/wp-admin/|/xmlrpc.php|/wp-login.php|wp-.*.php|index.php|/feed/|sitemap(_index)?.xml)") {
        set $skip_cache 1;
    }

    # Don't cache if user has special cookies (logged in, WooCommerce active)
    if ($no_cache_cookies = 1) {
        set $skip_cache 1;
    }

    # Main location block — WordPress permalink handling
    location / {
        try_files $uri $uri/ /index.php?$args;
    }

    # PHP-FPM processing
    location ~ \.php$ {
        # Security: block access to PHP files in uploads
        try_files $uri =404;
        fastcgi_split_path_info ^(.+\.php)(/.+)$;

        # Connect to PHP-FPM via Unix socket
        fastcgi_pass unix:/run/php-fpm/www.sock;
        fastcgi_index index.php;

        # Standard FastCGI params
        include fastcgi_params;
        fastcgi_param SCRIPT_FILENAME $document_root$fastcgi_script_name;
        fastcgi_param PATH_INFO $fastcgi_path_info;

        # FastCGI cache directives
        fastcgi_cache WORDPRESS;
        fastcgi_cache_valid 200 301 302 1h;  # Cache successful responses for 1 hour
        fastcgi_cache_bypass $skip_cache;
        fastcgi_no_cache $skip_cache;

        # Add cache status header (for debugging — shows HIT/MISS/BYPASS)
        add_header X-Cache-Status $upstream_cache_status always;

        # Timeouts
        fastcgi_read_timeout 300;
        fastcgi_buffers 16 16k;
        fastcgi_buffer_size 32k;
    }

    # Static files — served directly, no PHP needed
    location ~* \.(js|css|png|jpg|jpeg|gif|ico|svg|woff|woff2|ttf|eot)$ {
        expires max;
        log_not_found off;
        access_log off;
    }

    # Deny access to sensitive files
    location ~ /\. {
        deny all;
        access_log off;
        log_not_found off;
    }

    location = /favicon.ico {
        log_not_found off;
        access_log off;
    }

    location = /robots.txt {
        allow all;
        log_not_found off;
        access_log off;
    }

    # Block access to WordPress config and sensitive files
    location ~* wp-config.php {
        deny all;
    }
}
Understanding the Key Directives
try_files $uri $uri/ /index.php?$args
This handles WordPress pretty permalinks. When someone visits /about/, Nginx checks if a file called about exists, then if a directory called about/ exists, and if neither, passes the request to WordPress’s index.php. Without this, only the homepage works.
fastcgi_pass unix:/run/php-fpm/www.sock
Sends PHP requests to the Unix socket we configured in the previous article. Must match the listen value in /etc/php-fpm.d/www.conf.
fastcgi_cache WORDPRESS
Enables caching using the zone defined in nginx.conf. WORDPRESS is the zone name — it must match keys_zone=WORDPRESS:100m exactly.
fastcgi_cache_bypass $skip_cache and fastcgi_no_cache $skip_cache
Two separate directives that both need to be set. bypass tells Nginx not to serve a cached response. no_cache tells Nginx not to store the response in cache. Both are needed to fully disable caching for the conditions we defined.
add_header X-Cache-Status $upstream_cache_status always
Adds a header to responses showing whether the page was served from cache (HIT), generated fresh (MISS), or deliberately bypassed (BYPASS). Used for debugging — check it with curl -I https://yourdomain.com.
The $skip_cache bypass rules
Four conditions that bypass the cache:
- POST requests — form submissions must reach PHP
- URLs with query strings — search results, paginated content
- WordPress admin paths — dynamic, user-specific
- Cookie-based bypass — logged-in users, WooCommerce sessions
Step 4 — Test and Apply
# Test for syntax errors
sudo nginx -t

# If test passes, reload
sudo systemctl reload nginx
If nginx -t shows an error, it will point to the file and line number. Common issues:
- Missing semicolon at end of a directive
- Typo in the domain name
- Wrong PHP-FPM socket path
Basic Server Block Variants
Redirect all HTTP to HTTPS (use after SSL setup in Part 5):
server {
    listen 80;
    server_name yourdomain.com www.yourdomain.com;
    return 301 https://$host$request_uri;
}
Redirect www to non-www:
server {
    listen 443 ssl;
    server_name www.yourdomain.com;
    return 301 https://yourdomain.com$request_uri;
}
Block direct IP access (returns 444 — drops connection):
server {
    listen 80 default_server;
    server_name _;
    return 444;
}
Save these in your personal config notes — they come up repeatedly.